Showing posts with label Deep Space Nine costume. Show all posts

April 16, 2015

Tutorial, part 15 - Shoulder Pads

The necessary loft of the shoulder pads will depend on the wearer's physique (as will the precise angle of the shoulder seam, for that matter); most non-raglan shoulder pads will work nicely, though, like these:


Place the shoulder pad inside the jumpsuit so that the pad's long edge is flush with the jumpsuit's armscye seam, and the pad's seam (if it has one) is flush with the jumpsuit's shoulder seam. 

Hand-stitch the pad securely in place to the yoke facing and armscye seam allowances being careful not to stitch all the way through to the outside of the garment. 

Repeat for the other side. 


NOTE: If you read our VOY duty jumpsuit analysis/tutorial, you may recall that on those jumpsuits, the shoulder pads were attached via two snaps along the shoulder seam; this was likely so they could be swapped out as needed amongst the cast and/or for dry-cleaning. However, unless you plan on sharing your uniform with another person or you plan on wearing it often enough for it to need to be dry-cleaned, we recommend sewing the shoulder pads rather than attaching them with snaps. 


TIP: We recommend securing the shoulder pad to the jumpsuit in only two places: the centermost and outermost portions of the shoulder pad along the shoulder seam. This will mimic the effect of the snaps used on the screen-used jumpsuits and prevent any unsightly puckering along the armscye caused by slightly misplaced or poorly sewn pads.


PREVIOUS: Tutorial, part 14 - Close Inseam

NEXT: Tutorial, part 16 - Internal Belt

Tips for Achieving an Ideal Fit

While some costumers may find a perfect fit in one of the "default" pattern sizes, it is somewhat unlikely due to variations in height, weight, build, musculature, neck size, and general physique. 

That's why we highly recommend making a muslin test or a "practice" garment of some kind (other than to familiarize yourself with its construction, that is!) - you can make the necessary sizing observations (e.g. sleeves need to be an inch longer, waist needs to be loosened, neckline needs to be taken in a bit, etc.). 

All this fitting does require extra time and effort on the part of the costumer, but the finished garment's custom-tailored look will definitely be worth it!


There are four main aspects of the garment that may need adjustment and the original pattern need be altered: the neckline, the chest, the waist, and the length of the garment (at various places). 

These revisions are not difficult to make, even to conform to NEMESIS "hero" uniform standards, provided one remembers the appropriate points at which the garment is to be aligned and/or coordinated. 


The neckline, for instance, is simply adjusted in lateral increments of half quilt-lines ... that is, it is widened (sideways) in increments of ⅜". 

The edge of the neck opening, for instance, falls exactly on a quilt line or mid-quilt line at the shoulder seam:

Mid-quilt line
Quilt line
Quilt line

If, for some reason, your neckline needs to be lengthened in the other direction, it is a simple matter of adding the appropriate length to the shoulder seam on each side. 

For instance, if your neckline needs to be lengthened (as opposed to widened, sideways) by ¼", simply add ⅛" to both the front yoke and the back yoke on the neckline side of the shoulder seam.


The opposite would be the case if you need it let out a bit at the shoulder/armscye. 

Just remember to adjust the seamline of your shoulder point accordingly!


Adjusting the chest at the bottom of the yoke is a fairly simple matter, too.

The chest sizes of the printed pattern are graded in increments of 4 ½" - that is, one additional ¾" quilt line on each front yoke, one additional ¾" quilt line on each side of the back yoke, and ⅜" on each side of the underarm/side front/side back seam and on both sides. 

Any chest alterations - between the "default" sizes on the printed pattern, that is - are easiest to make in increments of ¾". This is most effectively done by taking in the armscye seam in by ⅜" on either the back or both front yokes (wherever there's more excess), thus moving the seam's ⅛" topstitching from on a quilt line to a mid-quilt line. 

(All of the "default" printed pattern sizes place the yokes' armscye seam's topstitching on a quilt line, as we believe it to be ideal, but as noted in the construction analysis, a mid-quilt line is acceptable.)


In other words, the printed pattern piece will look like this in every size, in the front and the back:

Quilt line to quilt line

But you can add or remove ¾" to or from the chest by moving the armscye seam to a mid-quilt line, in either the front or the back:

Mid-quilt line to quilt line
Quilt line to mid-quilt line
Quilt line to quilt line


Of course, you can add or remove 1 ½" to or from the chest by doing in both the front AND the back. 

Remember to adjust your shoulder point, side front and/or back body panels accordingly. 
Another option, for minute chest alterations, is the top of the side front/side back seam (under the arm) - adjusting the sleeve (and sleeve lining) accordingly, of course!


The waist is, likewise, an easy aspect of the garment to alter.
Of course, as waist sizes vary widely amongst people, it's also, perhaps, the most likely to need adjustment.

Fortunately, on this jumpsuit, adjusting the waist is a fairly simple matter, as the jumpsuit, without the elastic waistband, is likely quite a bit too large around the waist. The elastic "shrinks" the waist of the jumpsuit body to the wearer to whatever degree is necessary for comfort and mobility. 

In most situations, the jumpsuit's waist will be adjustable however necessary by simply adjusting the length of the elastic inside the waistband channel; for instance, if you're using 8" lengths of elastic and the jumpsuit is uncomfortably tight around the waist, try using a 9" or 10" lengths on each side instead. 

Alternatively, if you're using 8" lengths of elastic and the jumpsuit is too baggy, try using 7" or 6" lengths on each side instead. 

In fact, during your muslin test, you might want to begin with a long cut of elastic - say, 12" - and sew the elastic channel on first over the elastic but only securing the back end of it. Then you can tighten the elastic as necessary by pulling it along the front and pinning, basting, or marking it where the fit is best, cutting off the excess (leaving about an inch "poking out" from the channel, of course) and securing it. 


Lengthening or shortening the garment is a simple matter, for the most part. 

Naturally, some people will be taller while others are shorter; some may have a long torso and short legs, or vice-versa. Some people may have a long waist and short thighs, while other people may have a tiny "seat" and very long legs. Builds obviously vary considerably!

On the jumpsuit body, there are three places where we recommend lengthening or shortening the body as needed to achieve an ideal fit. 

At whichever portion(s) of the body need to be lengthened, cut the pattern along one of the horizontal lines so it is two separate pieces, insert a small piece of paper underneath the two pieces, (a standard 8 ½" x 11" page will work nicely, as well any cheap craft paper you might have sitting around, or you could even put some of that junk mail to good use!), tape the three together, and, making sure the upper and lower portions are properly aligned (i.e. not straight and not crooked/slanted/etc.), use a ruler as a guide and draw a line on each side to connect them. Cut along these lines to form your new, extended pattern piece. 

I (Alex), for instance, need to lengthen the upper portion of the jumpsuit body by 1" so it doesn't ride up in the crotch uncomfortably in the front and give me a wedgie in the back (TMI?). 


Obviously, the same adjustment needs to be made to all of the body panels for the jumpsuit to go together properly. 

To shorten the garment, simply fold the pattern paper upward at the lines then back down again, or cut along one of the horizontal lines as if you were lengthening it and overlap the upper and lower portions however much is necessary, straightening the edges if needed. 


CONGRATULATIONS!!!

YOU'RE FINISHED!!!


If you found this tutorial helpful, please support my costume research on Ko-Fi! :)


Tutorial, part 17 - Odds and Ends

Just a few loose ends to tie up ...

Fold the top 1" of the zipper out of the way and hand sew a hook-and-eye closure to the body facing, taking care to only sew through the facing (and seam allowances) and not stitching through to the right side of the garment!


NOTE: We recommend using one regular (medium) size hook-and-eye closure, although the screen-used uniforms seemed to have sometimes used one medium closure or two small ones. The choice is up to you! We've had better results with the single medium closure, though.


Put your jumpsuit on again and determine adequate pants' hem allowance. (The pattern's default pant leg hem allowance is 2").

Pin your hem allowance place if possible. (It helps to have a partner with this.)

Take your jumpsuit back off and press your pants' hem allowance upward.

Hand sew the hem allowance to the pant legs.

Press the bottom of the pant legs.


DS9/NEM cadet jumpsuit pictured
Cut two lengths of ¾" elastic for the "stirrup" at the bottom of the pant legs. 

The exact length needed may vary from person to person depending on the length of the pant legs and the width of the wearer's boots, but we generally recommend cutting these about 8" long. 

Sew the elastic stirrups to the bottom of the pant legs at the side seams with a triangular stitch (with the "flat" side of the triangle on bottom). 


(The above example was done in gray thread slightly darker than the jumpsuit body, so it's easier to see; done in matching thread it would be practically unnoticeable.) 


NOTE: Depending on the placement of the sole and shape of the bottom of your boots, you may find 1" elastic to be preferable and more effective than the ¾" pictured above. 


PREVIOUS: Tutorial, part 16 - Internal Belt

NEXT: Tips for Achieving an Ideal Fit

Tutorial, part 16 - Internal Belt

To construct the internal belt of the jumpsuit, begin by opening it and laying it flat on the floor or your workspace. Open the fronts as much as possible so you have a clear view of the back elastic channels and spandex panel. 

Measure a length of 2" grossgrain ribbon or belting that extends from the back of one elastic channel to the other, plus about 2". 

Cut the length of ribbon or belting. 

Turn the ends under about 1" and sew them down. 

Press the ribbon briefly to flatten the ends.


Sew this length of ribbon or belting to the back ends of the waistband elastic that you left poking out of the back ends of the channels earlier. 


Cut two more lengths of ribbon or belting at least 12" to 16" long. 

Turn one end of each under about 1," then sew and press them each in the same manner as done previously with the back of the internal belt. 

Sew the sewn/pressed ends to the front ends of the waistband elastic that you left poking out of the front ends of the channels, just as you did for the back. 

Leave the two front lengths of ribbon or belting dangling for now. 


And now, the time has come for you to put on your jumpsuit!


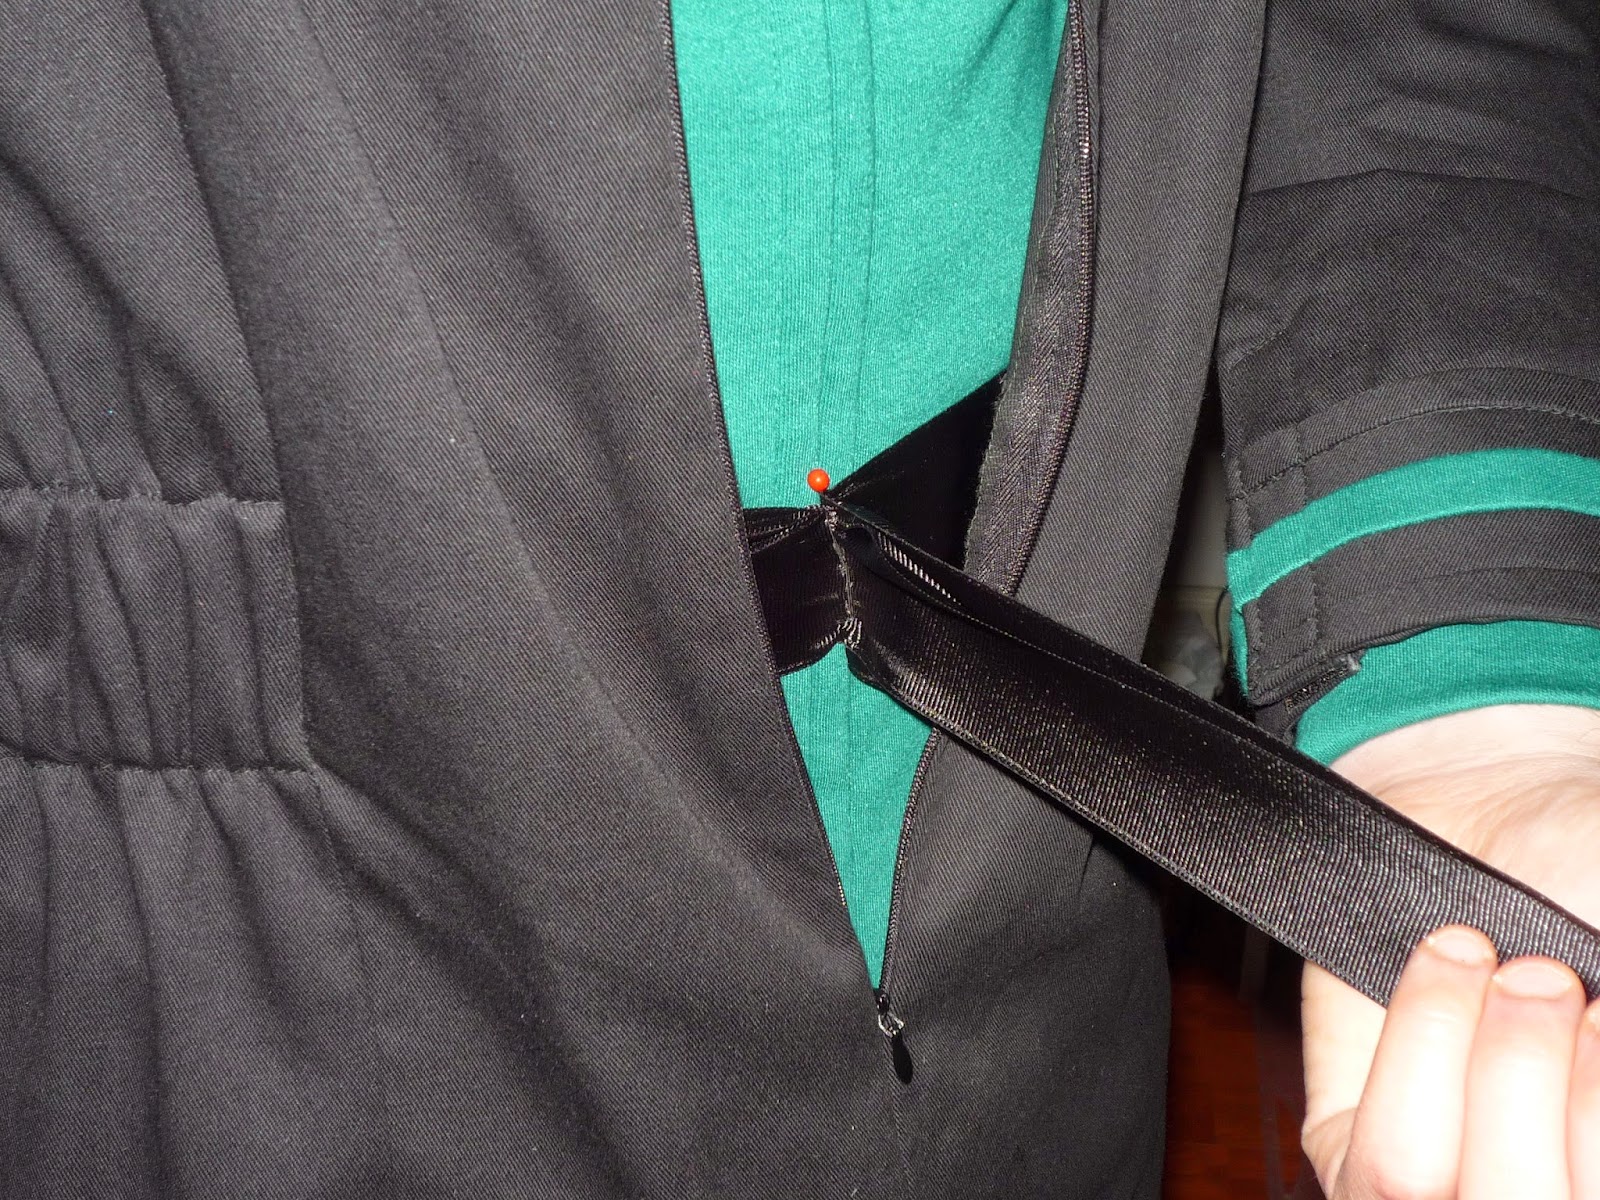
Pull the two lengths of ribbon or belting together, as symmetrically as possible, to a comfortable tautness. 

Pin (or even double-pin) the two lengths of ribbon or belting together at the front center.


TIP: We recommend wearing your division shirt plus any other undergarments you plan on wearing, as these may affect the necessary tautness of the belt, either by adding a modest but significant amount of bulk and/or by compressing your torso a bit (such as if you're wearing, say, Under Armour or your division shirt is on the small side).


Cut both ribbons approximately 1" from your pins' placement. 

Turn these ends under ¾" (not 1", since they will overlap slightly), then sew and press them as done previously. 

Hand sew two trouser-style hook-and-eye closures to the ribbon/belting. 

Your jumpsuit's finished internal belt should now look something like this: 


Tutorial, part 14 - Close Inseam

We recommend pressing the garment as much as possible while it's still open and the wrong side is still fairly easily accessible; it will be much more difficult to do so later (especially the pant legs). 


Sew the inseam closed in one long, continuous stitch, matching seam lines at the center bottom.

Press seam allowances open. (A pants seam pressing board is practically indispensible for this.)


The bottom of your jumpsuit's torso should now look like this: 


Tutorial, part 13 - Elastic Waistbands

Open your jumpsuit body so the inside is more easily accessible. 

Sew one edge of the elastic waistband channel (piece M) to the jumpsuit body along the lines indicated, ¼" from the edge. (We did the upper edge of the waistband channel first, but it doesn't really matter.) 

The stitch should begin and end exactly at the centermost side body panels' seam allowances. 

The stitch will also be visible on the outside of the jumpsuit, but it is supposed to be, so don't worry! 


Cut an appropriate length of 2" elastic, plus about 2" in addition to whatever amount you require for a comfortable elasticized fit. 

(And you do know how much you need because you made a muslin test or three first, right???) 

I (Alex), for instance, need about 8" of elastic on each side for a comfortable fit, so I cut a 10" length of elastic. 

Place your elastic so its upper edge is flush with the upper stitching line of the elastic channel, and it overhangs the side front/center front (or side back/center back) seam line by about 1". 

Fasten the elastic to the jumpsuit body securely by vertically stitching exactly over the body panel seam line. (Since you can't actually see it, just give it your best guess. It'll probably be fine.) 

Repeat for the other end of the elastic. 

Fold the elastic channel down over the elastic. 

Remember, about 1" of elastic should be "poking out" from each end of the channel. 


Using your zipper/piping foot, sew down the other end of the elastic channel (lower end, in this case) ¼" from the edge of the elastic channel.


TIP: As the elastic will, by its very nature, cause the channel to gather and contract (that's what it's there for ... duh!), it can be difficult to sew the lower edge without the channel shifting or accidentally sewing puckers or other such undesirable outcomes. (It's even harder to do while holding a camera ...) We recommend pulling the elastic so all the gathering is on the half of the channel closest to you, sewing from the far edge to the side seam, leaving the needle down and lifting the presser foot, then redistributing the elasticity/gathering of the fabric to the sewn half of the elastic channel, lowering the presser foot and continuing as best you can. 


The inside of your finished elastic channel should now look something like this: 


TIP: If you have black elastic, then we recommend using it instead of white or some other color! The likelihood that it will matter is negligible, but sometimes when securing the ends of the elastic to the body the sewing needle might "poke" a thread or two of the elastic through to the right side of the garment, causing a teeny white fleck to be visible on the outside of the jumpsuit. The same thing might happen if you accidentally "nick" the elastic when sewing on the lower edge of the elastic channel. Better safe than sorry! 

(We used white elastic mainly because it was easier to demonstrate the construction process in this tutorial, but pretty much every screen-used jumpsuit we've seen the inside of had white elastic, so, again, it's not a big deal.)


PREVIOUS: Tutorial, part 12 - Close Sides and Sleeve Vents

NEXT: Tutorial, part 14 - Close Inseam

Tutorial, part 12 - Close Sides and Sleeve Vents

For "regular" sleeves, sew the jumpsuit body's side seam and sleeve seam closed in one continuous stitch, from the bottom of the pant leg to the bottom of the sleeve. 

Press the seam allowances open. 

Fold the sleeve's hem allowance upward and press. 

Sew or baste the hem allowance to the sleeve 2" from the bottom of the sleeve.


Grab your unfinished sleeve cuff from earlier, with the bands unfolded: 


Sew the sleeve cuff closed along the sides (with the bands open), matching seam lines and right sides facing. 


Press the seam allowances open.


Turn the sleeve cuff assembly right side out and fold the bands under again. 


Pin the undersides of the bands in place along the band/inner layer seam lines. 


"Stitch in the ditch" along the band/inner layer seam lines to secure the undersides of the bands. 


Your sleeve cuff should now look finished - how it will once it's on the actual sleeve.


"Mount" the sleeve cuff onto the sleeve, matching bottom edges and seam lines, and pin into place. 


"Stitch in the ditch" again along the band/inner layer seam lines to secure the sleeve cuff to the sleeve.


Your finished sleeve cuff should now look like this:


Repeat for other side.


For vented sleeves, sew the jumpsuit body's side seam and sleeve seam closed in one continuous stitch, from the bottom of the pant leg to the upper edge of the sleeve vent, pivoting at the vent and reinforcing the seam several times at the top of the vent. 


Clip through all layers diagonally from the top corner of the vent to the stitch line pivot. 


Press seam allowances open. 

Fold the front side of the sleeve under ¾" (wrong sides together) and press. 


TIP: From the right side, "stitch in the ditch" again along the outermost ¾" of the sleeve cuff bands to secure the under-turned cuff before attaching the hook and loop tape ("Velcro"). 


Cut a 3 ½" length of ¾" black hook and loop tape - 3 ⅝" if you're feeling brave! 

Sew the "Velcro" to the underside of the front sleeve cuff (the part you folded under) and the right side of the back sleeve cuff (the flat part). 


Your finished sleeve vent should look something like this: 


Tutorial, part 11 - Sleeves to Body

Pin the sleeve assembly to the appropriate side of the jumpsuit body, matching the "center" quilt line with the shoulder seam and the lower edges of the shoulder point with the bottom of the jumpsuit body's yoke.

Baste the sleeve assembly to the jumpsuit body. 

Flip the garment around (right sides out) and inspect to confirm proper alignment of the "center" quilt line and shoulder seam, as well as the shoulder point trim with the jumpsuit body's yoke trim. 

Once satisfied with the proper alignment, sew the sleeve assembly to the jumpsuit body, using black thread for the sleeve portion and gray thread for the yoke. We recommend stitching twice for thoroughness (as done before with the yoke), as well as reinforcing at the shoulder seam and bottom of the shoulder point/yoke.


TIP: We recommend using your quilting/walking foot to baste at the three key areas (front yoke bottom, "center" quilt line/shoulder seam, and back yoke bottom) first, adjusting as necessary. Once these three intersections have been properly aligned, sew the shoulder point to the yoke, then switch to black thread and a regular foot to sew the remainder of the armscye (sleeve and lower sleeve hole). Once satisfied with the joining, stitch the shoulder point to the yoke again and reinforce at the aforementioned three key areas.


Press the armscye seam allowances open using a tailor's ham.


It's at this point that you'll be glad you clipped out the batting/backing in a few areas to reduce bulk!


As done previously with the shoulder seam, topstitch both the yoke and shoulder point ⅛" on each side of and parallel to the armscye seam, forming three parallel lines and securing the seam allowances in place. 


Remember, the bottom of the armscye topstitch should meet a quilt line or a mid-quilt line on both the yoke and shoulder point, and at the shoulder seam the armscye topstitch should "peak" where the next quilt line would be.


Also, the action pleat should extend all the way to the armscye, and its top edge should meet the yoke exactly at the yoke/body seam line at the armscye. 


Repeat for other side.


Tutorial, part 10 - Sleeve Cuff

This is a prime example of an assembly that might seem dauntingly complicated at first but actually isn't very difficult after actually practicing it once or twice. 

The assembly itself is in five pieces, plus interfacing.


Start by fusing the interfacing to the sleeve cuff bands (piece J).

This will give them more dimension, as they tend to look disappointingly flat without it. It will also make the cuff sturdier, which is particularly important for the upper band; you don't want it to flop around! 


The sleeve cuff pattern pieces, "in order," will look like this:


Start by sewing the upper band (piece J) to the inner layer (piece K), right sides together and edges flush. 


Press the seam allowances upward, and press the inner layer down. 


Fold the band piece over the seam allowances and press it down toward the underside, so that the wrong sides of the band and inner layer are facing and their lower edges are flush. This forms the actual band. 


Sew the upper band assembly to the division stripe with ¼" seam allowance, with the long edges of the division stripe and the inner layer flush and right sides together. 


Press the seam allowances toward the division stripe. 

Repeat for the bottom half of the cuff. 


If you're making "regular" sleeves (with no vents), set the sleeve cuff aside for now and skip to the next step. 

If you're making vented sleeves, fold the bands back under. 


"Stitch in the ditch" to secure the undersides of the band and form the actual sleeve cuff. 

Serge the outside (short, raw) edges of the cuff. 


Fold the sleeve hem upward and press. 


Sew or baste the hem allowance to the sleeve along the sleeve sides and pin the upper edge into place. 


NOTE: The sleeve, as it is on the pattern, has 4" hem allowance, which is generous, to say the least - double the 2" hem allowance sleeves usually have. This was done for two reasons: first, to provide the widest range of potential hems for the costumer, and second, so that the hem would extend all the way to the top of the sleeve vent on the vented sleeves. 

The process of attaching the sleeve cuff and constructing the vented sleeve does not require 4" hem allowance to work properly! 

Whether you are constructing "regular" or vented sleeves, you may reduce the hem allowance if you wish; if you do so, we recommend reducing it to 2 ½" or even 3" to ensure that it will be secured when the sleeve cuff is attached. 


Pin the sleeve cuff to the right side of the sleeve, facing upward. 


"Stitch in the ditch" along the lower edge of the upper sleeve cuff band and along the upper edge of the lower band to secure the sleeve cuff to the sleeve. 


OPTIONAL: Hand sew the upper edge of the hem allowances into place. 

You should now have two (otherwise) finished sleeves, huzzah! 

(Vented sleeves pictured above)